Automatically apply Checklist Templates to transactions based on Status or Label. specific criteria set by an admin. This streamlines the transaction management process and delivers hands-off consistency on transactions.
Apply checklists automatically based on Status or Label. You can further customize rules based on Location or Side.
Automatic Checklist Application saves your team time and boosts the reliability and consistency of your transaction management. By automatically applying checklists to transactions based on rules set by admins, it streamlines processes and improves team coordination.
Admins can customize these rules based on a transaction's Location, Status, Side, and Label, ensuring the right tasks are automatically applied at the right time. This reduces the risk of human error and ensures all steps are completed for a successful transaction.
With automated checklists, your team can focus on more critical tasks, leading to increased efficiency and better overall performance.
Admin Setup
Admins automatically apply relevant checklists to transactions by setting up rules. These rules determine what criteria should be met on a transaction in order to automatically apply a checklist, ensuring the right tasks are assigned to the right transactions.
Custom Rules
You can create custom rules for automatically applying checklists to transactions based on:
-
Location: Checklists can automatically apply to specific Locations within your account. Alternatively, you can choose the "Apply to All" option to ensure the checklist is applied across all locations.
-
Status: Checklists can automatically apply depending on the Transaction Status. For example, when a transaction reaches the Under Contract status, a specific checklist is added to cover all necessary tasks.
-
Side: Checklists can automatically apply depending on the Side your office represents. For example, the buyer's side may have tasks related to inspections, while the seller's side may focus on disclosures. The system applies the correct checklist based on which side you're handling.
-
Label: Transaction Labels allow further customization. For example, a checklist with additional steps for "Commercial" properties can be automatically applied to transactions with the "Commerical" label.
Combining Rules
You can combine different rules to create a customized workflow that fits each transaction's needs.
Status + Side: Combine these to apply specific checklists for buyers or sellers when a transaction reaches a certain status. For example, when a transaction is "Under Contract," the buyer might need inspection tasks, while the seller needs disclosure tasks.
Status + Label: Combine these to apply checklists based on a transaction's status and property type. For instance, when a transaction is "Closed" and labeled as "Residential," you can trigger post-closing tasks.
Side + Label: Combine these for specialized deals. For example, for a buyer-side transaction labeled as "Investment," the checklist can include financial due diligence and property analysis tasks.
Status + Side + Label + Location: For the most tailored workflow, combine status, side, label, and location. For example, for a "Commercial" property "Under Contract" on the buyer’s side in a specific location, the system can apply a checklist that includes inspections and specialized communications.
Automatic Checklist Application offers several key benefits, including:
Saves Time: Eliminates manual task assignments, streamlining the transaction process.
Ensures Consistency and Compliance: Adheres to predefined rules, maintaining high standards of accuracy across transactions.
Reduces Human Error: Automatically assigns the correct tasks, ensuring all necessary steps are followed.
Enhances Team Coordination: Provides a clear, structured approach to task management, keeping teams aligned and on track.
-
When an offer is accepted, a checklist for the required documents can be automatically applied to Pending Status transactions.
-
A checklist for documents required when your office represents the Listing Side can be automatically applied to Listing Side transactions.
-
If both commercial and residential transactions require the same checklist of tasks, specify both "Commercial" and "Residential" in the Label section to allow the checklist to be applied in either case.
-
A checklist for documents required when your office represents the buyer on commercial transactions under contract may be automatically applied to Pending Status / Commercial Label / Buying Side transactions.
To ensure the most relevant tasks are automatically applied to transactions, use Status, Label, and Side together.
Automatically apply a checklist to transactions based on specific criteria such as Status, Side, or Label.
Who Can Do This: Admins with permission to Fully manage checklists and templates.
To automatically apply a Checklist Template to transactions:
- Go to Checklist Templates:
- Click your name in the upper right corner, then [Admin / Settings].
- Select [Checklists] from the Templates section of the left menu.
- Open Template:
- Either add a new Checklist Template or edit an existing one.
Learn how to Add & Edit Checklist Templates →
- Either add a new Checklist Template or edit an existing one.
- Set Locations:
- If your office has one Location, the checklist will apply to all transactions.
- If your office has multiple, select the locations whose transactions this checklist should be automatically applied to.
- This also allows admins in the selected location to edit and manage the template.

- Automatically Apply Checklist:
- Check the box next to "Automatically apply this checklist to transactions."

- Check the box next to "Automatically apply this checklist to transactions."
- Set Rules & Save:
- Set the desired rules (described below).
- Click [Save Template] to save your changes.


Status
Select the Status that will trigger the checklist to be added to transactions.

You can specify, either:
-
Status Category: Choose a Status Category with a blue background, such as Active, Listing, Pending, Closed, Fell Through, or Auto Expiry.
-
Custom Status: Alternatively, select one of your company's custom Transaction Statuses listed between the blue background Status Categories.
Side
Set the checklist to apply automatically based on the Side your office represents. By default, checklists apply to any Side.

You can specify one of the following Side options:
-
Any: Applies to all transactions, whether your office represents the buyer, seller, or both.
-
Listing: Applies when your office represents the seller (with an in-house Listing Agent).
-
Buying: Applies when your office represents the buyer (with an in-house Selling Agent).
-
Dual-sided: Applies when your office represents both the seller and buyer (with both an in-house Listing and Selling Agent).
Label
Set the checklist to automatically apply to transactions with specific Transaction Label(s). By default, checklists apply to any Label.

You can specify any of your company's custom Transaction Labels.
All Locations
If your office has multiple locations, this checklist will automatically apply to transactions in the Locations specified at the top of the template.
Optionally, master admins can set the checklist to be automatically applied to transactions in all locations (described below).
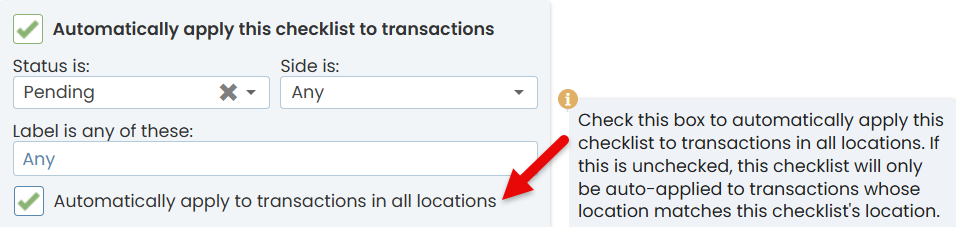
Automatically apply a checklist to transactions in all locations.
Who Can Do This: Master admins.
To automatically apply a Checklist Template to transactions in all locations:
- Go to Checklist Templates:
- Click your name in the upper right corner, then [Admin / Settings].
- Select [Checklists] from the Templates section of the left menu.
- Open Template:
- Either add a new Checklist Template or edit an existing one.
Learn how to Add & Edit Checklist Templates →
- Either add a new Checklist Template or edit an existing one.
- Automatically Apply Checklist:
- Check the box next to "Automatically apply this checklist to transactions."
- Check the box next to "Automatically apply this checklist to transactions."
- Set Rules:
- Set the desired rules (described above).
- Apply to All Locations:
- Check the box next to "Automatically apply to transactions in all locations".
- Check the box next to "Automatically apply to transactions in all locations".
- Save:
- Click [Save Template] to save your changes.
