Sending notes and emails from the transaction keeps all your communication in one place, tied directly to the transaction. Whether you're sharing updates with your team, emailing clients, or replying to messages, everything stays connected to the deal.
Every transaction in Paperless Pipeline gives you a dedicated space to manage communication so messages stay organized, available, and tied to the deal they belong to.
One Place to Talk About the Deal
Each transaction gives you a central place to communicate. It’s where you add notes, send emails, reply to messages, and keep everything tied to what’s happening with that transaction.
Messages don’t get lost. They’re logged automatically in the Notes & Sent Emails section and recorded in the transaction history. You don’t have to remember to track them — the system does that for you.
Messages Adapt to Recipients
Pipeline knows who you're messaging and formats things accordingly.
If you're emailing someone on your team, they'll get a message that links back to the transaction and includes their personal maildrop address (which only they can see). They can reply right from the transaction or from their inbox — either way, it logs back in.
If you're messaging someone outside of Pipeline, they'll get a clean, straightforward message without any internal extras.
You don’t need to tweak anything, Pipeline just handles it.
Everyone Sees What's Relevant
Messages sent from a transaction are visible to everyone on the transaction, unless they're marked as private.
Messages that are emailed into a transaction via maildrop are more limited. Admins can see all incoming messages while Agents and team members can see the messages they personally sent in.
This keeps things clean and makes sure people only see what’s actually relevant to them.
Everything Stays Together
Replies, document comments, back-and-forths, they all stay linked to the transaction. One ongoing thread, always in the right place. No messy email chains. No scattered conversations.
You don’t have to organize anything manually, it all stays tidy on its own.
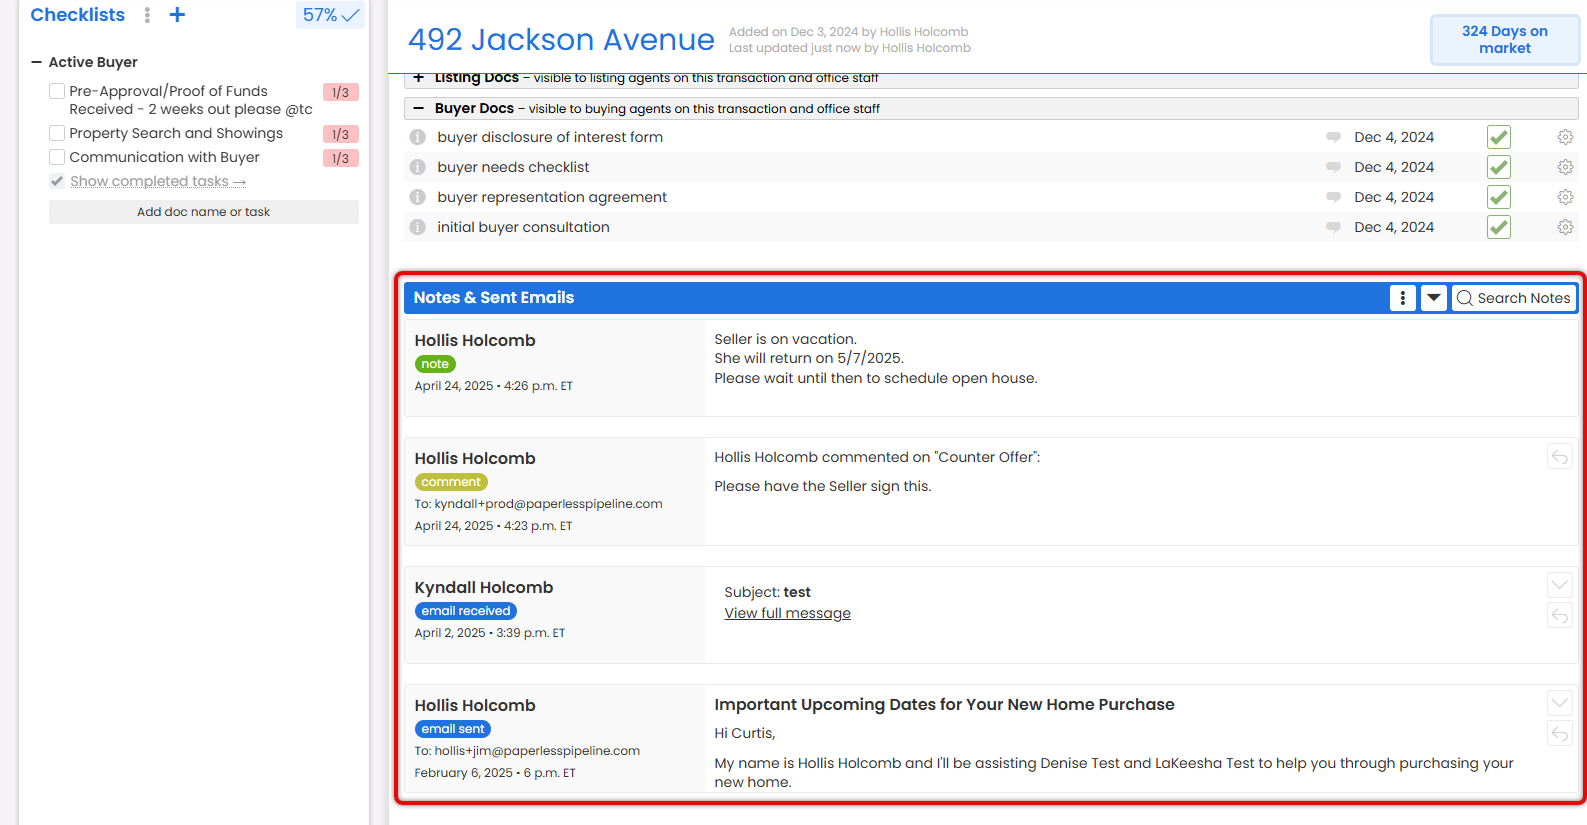
View notes added and emails sent or receivedfor the transaction, so you can stay informed and keep track of communication.
Who Can Do This: Anyone can view messages sent from a transaction. Admins see all received emails; agents see only their own.
Notes & Sent Emails
To view a transaction's notes and sent emails:
- Go to a Transaction
- Open the transaction you want to view messages for.
- Access Notes & Sent Emails
- Scroll down to the Notes & Sent Emails area.
- View the List
- See all notes and sent emails for this transaction.
- Use the action menu at the top right of Notes & Sent Emails to access additional options:
- To show timestamps, click [
 ] and check [Show timestamps].
 - To expand all notes, click [
 ].
]. - Use
 to find notes by content or date.
- To show timestamps, click [
- View an Individual Message
- View each message in the list.
- To view the full message, click [
 ] next to the item you want to expand.

 ] and check [Show timestamps].
 ].
]. to find notes by content or date.
 ] next to the item you want to expand.
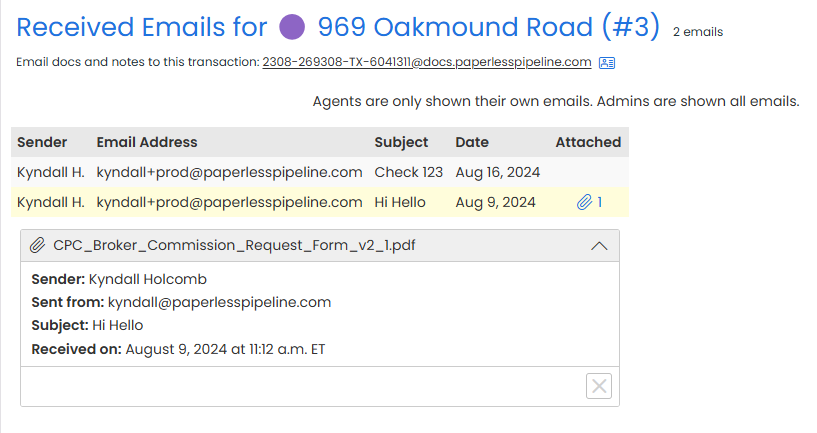
Received Emails
To view a transaction's received emails:
- Go to a Transaction
- Open the transaction you want to view messages for.
- Access Received Emails
- Click [Received Emails]. The number displayed next to Received Emails shows how many emails have been received for this transaction.
- View the List
- See emails sent to the transaction.

- View an Individual Received Message
- Click a message to open and view it.
- If an email includes an attachment, a paperclip icon will appear in the Attached column next to the number of attached files.


Add an internal note to record important details on the transaction when it's not necessary to notify others.
Who Can Do This: Anyone.
To add a note to a transaction:
- Access the Note / Email Area
- Go to transaction.
- Scroll down
- Add a Subject and Message
- Subject
- Message
- Make This Note Private (Optional)
- Check option to
- Save the Note
- Add the note.
To send or schedule an email from a transaction:
- Go to a Transaction
- Open a transaction.
- Start an Email
- Scroll down the page and click [Note / Email].
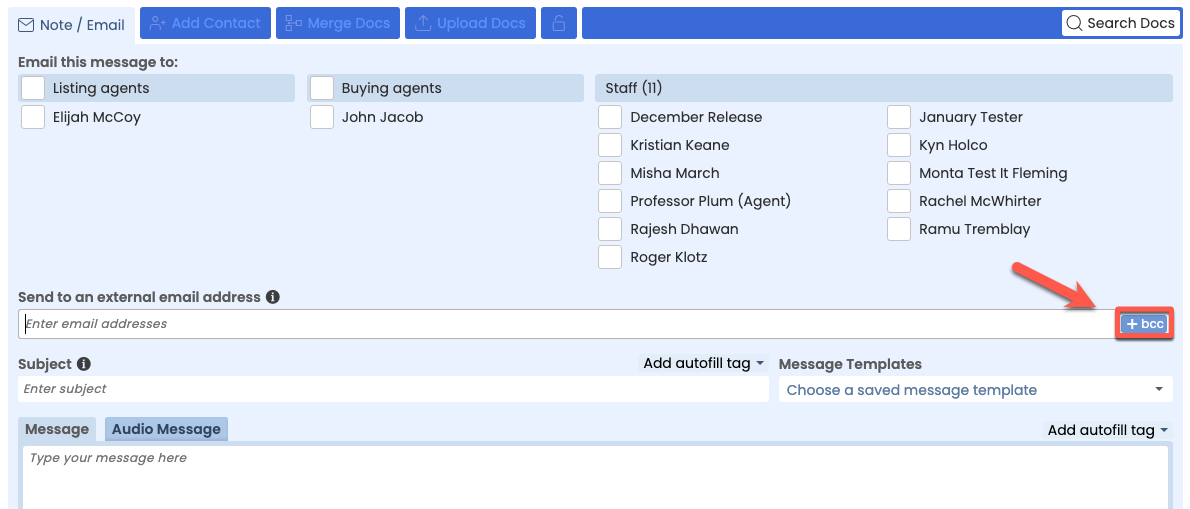
- Specify Recipients
- Select your desired recipients (outlined below).
Agents & Staff
To include agents and staff, click the checkbox to the left of their name.
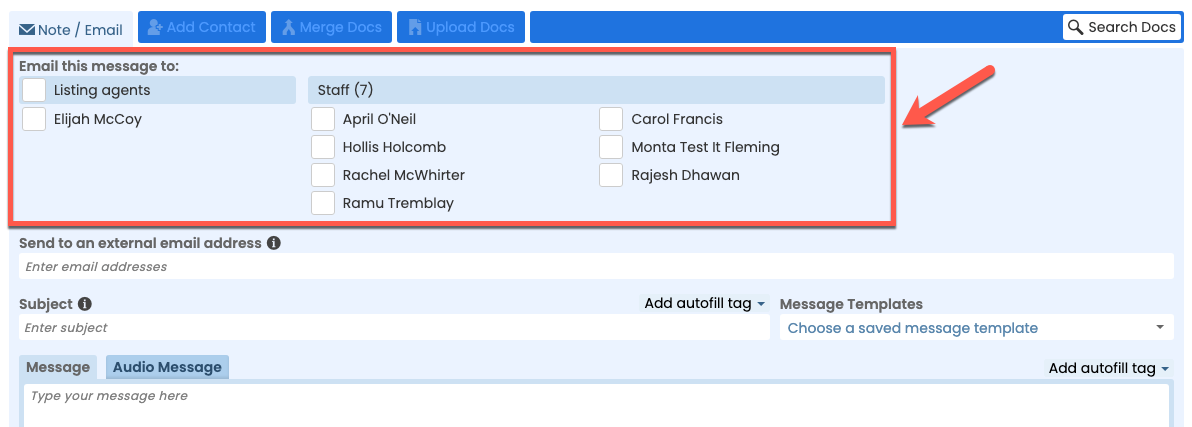
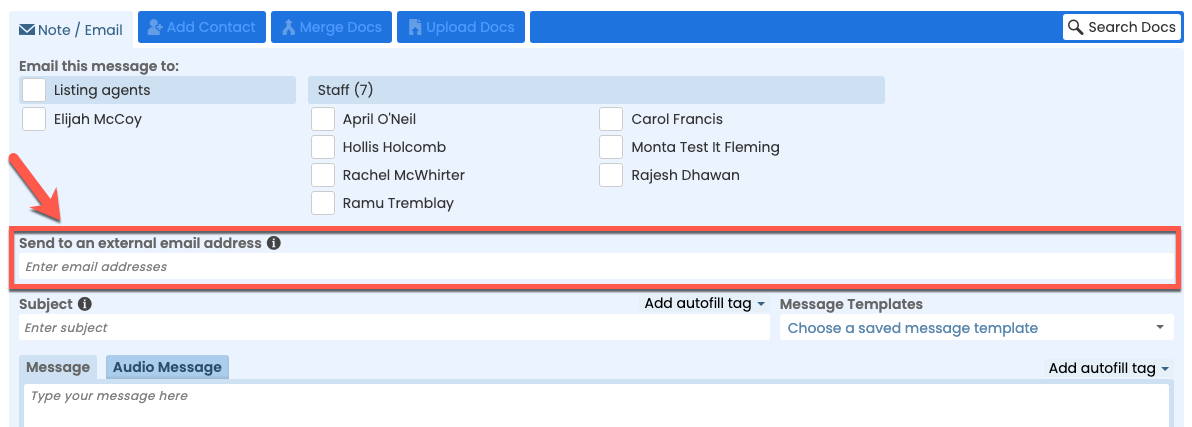
Outside Contacts
To include outside contacts, drag and drop the Contact into the External Email Address area, or type their email address(es).
BCC Someone
To blind copy someone, click [+ BCC], then drag and drop the Contact into the BCC area, or type their email address(es).
- Select your desired recipients (outlined below).
- Add a Subject & Message
- Enter a Subject. Pipeline will automatically add the Transaction Name or Property Address to the end. If you leave it blank, the subject will be the Transaction Name or Property Address by itself.
- Enter a Message.
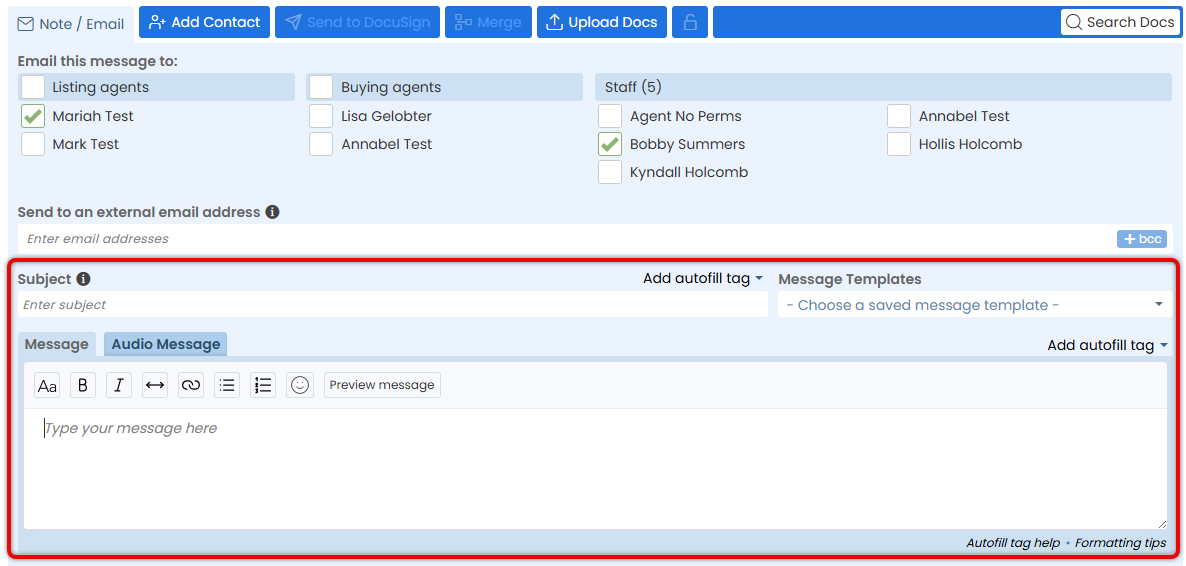
- Select Message Options
- Optionally, select your desired message settings (outlined below).

Make The Note Private
Click [Make this note private].
BCC Yourself
Click [Send me a BCC].
Save As a Reusable Template
Clik [Save this message as a reusable template].
Use Alternate Email Signatures
Use an alternate email signature to either include an agent's signature when sending a message on their behalf, or to exclude a signature altogether when sending an unbranded email.
Append Tasks
Append incomplete, completed, or overdue tasks.
- Optionally, select your desired message settings (outlined below).
- Attach Docs
- Optionally, add docs as attachments (outlined below).
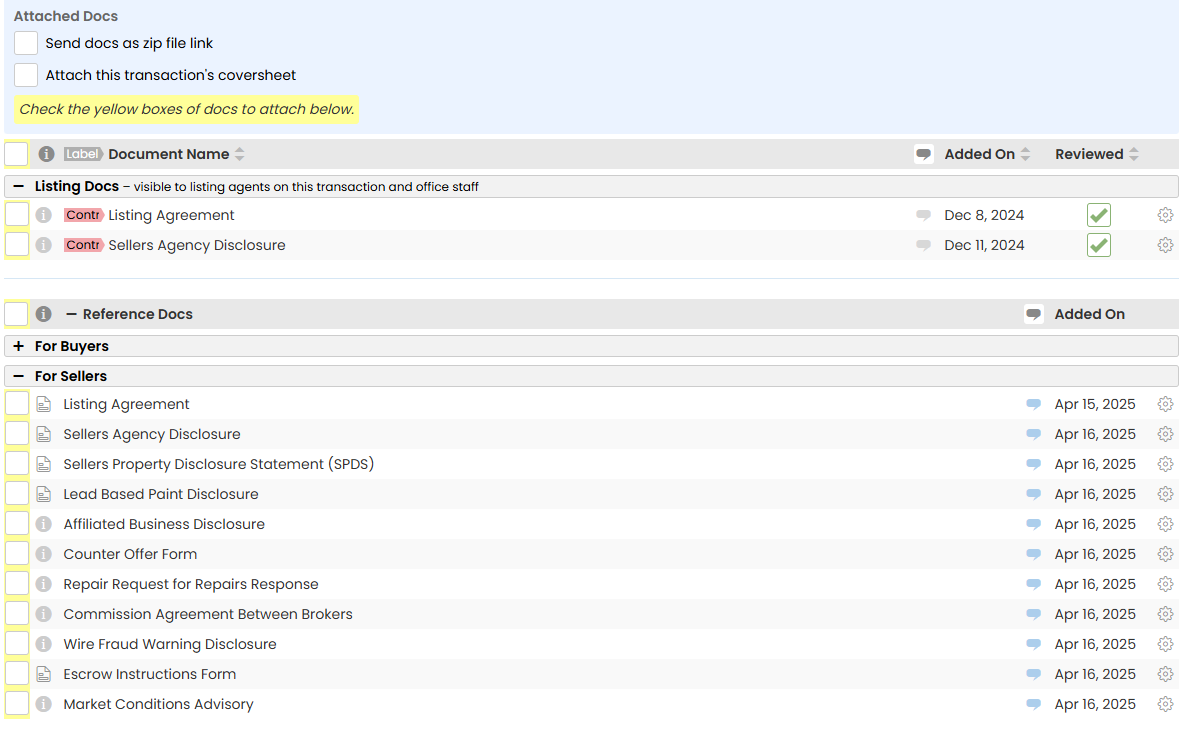
Transaction Docs
Use the Docs list to select docs uploaded to the transaction.
Reference Docs
Use the Reference Docs list to select docs from your Reference Library.
Zip File Link
To send the attached docs as a single Zip File package, select [Send Docs as Zip File Link].
Coversheet
To include the transaction's coversheet as an attachment, select [Attach this transaction's coversheet].
Optionally, select [Include contacts in this coversheet] to include the transaction's contacts with the coversheet.
- Optionally, add docs as attachments (outlined below).
- Send Email
- When it's ready to go, send the message now or schedule for later (outlined below).
Send Now
Click [Send Email] to send it now.
Schedule for Later
To schedule it to send later, click the [
 ] next to Send Email, then select [Schedule Send].
After that, choose either:- [Absolute Date] to set a specific date and time.
- Or, [Relative Date] to send based on a transaction milestone.
- When it's ready to go, send the message now or schedule for later (outlined below).


 ] next to Send Email, then select [Schedule Send].
Reply to messages on the transaction, including emails sent, emails received and doc comments.
Who Can Do This: Anyone.
Reply in Pipeline
To reply to a message on a transaction:
- Go to a Transaction
- Access Notes & Sent Emails
- Start Reply
- Click [
 ] to open the reply.
- Click [
- Continue Sending
- Continue sending the email (as described above).
Reply Outside of Pipeline
To reply to a message outside of Pipeline:
- Open the Email
- Open the message in your email inbox.
- Start Reply
- Select Recipients
- To