Relative Due Dates are set based on transaction dates, making task scheduling flexible, and are assigned when the transaction date is entered.
Through the Long Introduction, the reader will get a detailed overview of the topic, starting with a description of the feature or function. It aims to give a comprehensive understanding of what to expect and how it works.
The Long Introduction provides an in-depth explanation of the benefits and how it helps the user. It highlights the advantages and practical applications, making it clear why this feature is valuable. Sentences are kept concise and maintain a conversational tone, making the information easy to understand and follow.
By providing this detailed overview, users gain a better grasp of the topic, enabling them to fully leverage the feature's capabilities and benefits for their needs.
Provide a clear, step-by-step explanation of how a particular feature or function operates within the system.
Format:
- Title: Begin each section with a brief, descriptive title.
- Overview Paragraph: Start with a concise overview of the feature or function, explaining its purpose and relevance.
- Detailed Steps or Descriptions: Break down the process into clear, actionable steps or detailed descriptions.
- List of Actions: Include a bulleted or numbered list of specific actions, permissions, or capabilities.
- Additional Details: Provide any additional necessary details or exceptions to ensure full understanding.
- Maintain Clarity and Consistency: Ensure the language is straightforward, maintaining a consistent and professional tone throughout.
Field / Function
Begin with an optional introduction that provides a brief overview of the feature or function, its purpose, and its significance to the user.
Field / Function
Provide a detailed description of the feature or function. Explain how it operates within the system and outline its main capabilities.
Users can:
- [Action 1]: Describe the first action that users can take, highlighting its purpose and benefit.
- [Action 2]: Describe the second action, emphasizing how it helps the user.
- [Action 3]: Explain another action or capability, focusing on its importance and usage.
- [Action 4]: Mention any additional actions, detailing their functionality and advantages.
Field / Function
Offer more specific details about the feature or function, particularly any roles, permissions, or exceptions. Explain any limitations or special conditions that apply.
Users with specific roles have:
- [Permission 1]: Describe the first permission or restriction, noting its relevance and impact.
- [Permission 2]: Outline another permission or limitation, explaining how it affects usage.
- [Permission 3]: Mention any other permissions or restrictions, ensuring users understand their implications.
Set Relative Due Dates for tasks on Checklist Templates, ensuring their due dates automatically adjust based on important transaction dates once added to transactions.
Who Can Do This: Admins with permission to Fully manage checklists and templates.
To set a task's Relative Due Date:
- Go to Checklist Templates:
- Click your name in the upper right corner, then [Admin / Settings].
- Select [Checklists] from the Templates section of the left menu.
- Open Template:
- Either add a new Checklist Template or edit an existing one.
Learn how to Add & Edit Checklist Templates →
- Either add a new Checklist Template or edit an existing one.
- Open Calendar:
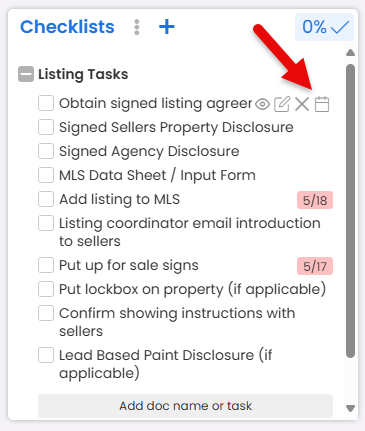
- Click the [calendar icon] next to the task.
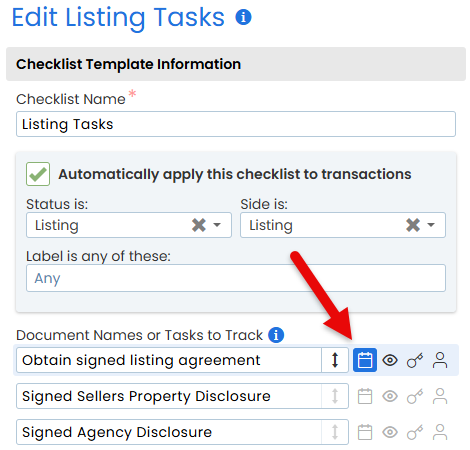
- Click the [calendar icon] next to the task.
- Build Rule:
- Enter the number of days for the rule.

- Choose the method for calculating the days:

- Business Days: Excludes Saturdays, Sundays, and your company’s Business Holidays.
- Calendar Days: Uses all days on the calendar.
- Calendar Days (Due Business Days): Uses all days on the calendar but moves the due date to the next business day if it falls on a weekend or a business holiday.
- Enter the number of days for the rule.
- Set Timing:
- Select whether the due date should be Before, After, or On the specific date.
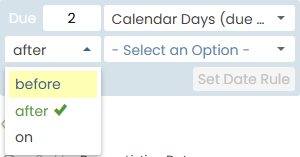
- Select whether the due date should be Before, After, or On the specific date.
- Choose Date:
- Set the transaction date to base the due date on. You can specify any important transaction date, including Optional Dates and Custom Dates:

- Transaction Dates:
- Transaction Creation Date
- Checklist Addition Date
- Listing Date
- Acceptance Date
- Close Date
- Expiration Date
- Optional Dates: You can also base Relative Due Dates on Optional Dates if your company has turned them on.
- Custom Date Fields: You can also set up Custom Fields for dates and set them to be additional trigger dates for tasks.
- Transaction Dates:
- Set the transaction date to base the due date on. You can specify any important transaction date, including Optional Dates and Custom Dates:
- Save Date & Repeat:
- Click [Set Date Rule] to save the new date rule.
- Repeat for as many tasks as you can to ensure task management is as hands-off as possible.
- Save Template:
- Click [Save Template] to save your changes to the template.


Set Relative Due Dates for tasks on transactions so their due dates automatically adjust based on important transaction dates.
Who Can Do This: Admins with permission to Fully manage checklists and templates.
To set a Relative Due Date for a task on a transaction:
- Go To a Transaction:
-
- Add or Edit Task:
- Add a new task or edit an existing task on your preferred checklist.
Learn how to Add & Edit Checklists on Transactions →
- Add a new task or edit an existing task on your preferred checklist.
- Set Due Date:
- Hover over the task.
- Click the [calendar icon] that appears next to it.
- Build Date Rule:
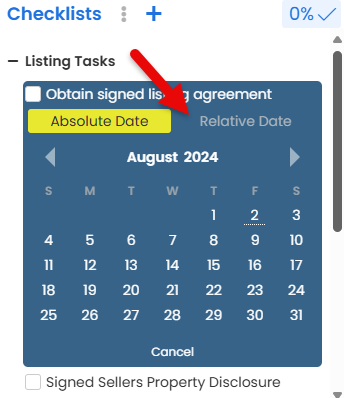
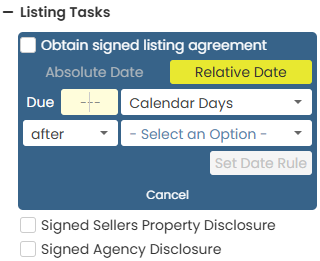
- Select [Relative Date].
- Enter the number of days for the rule.
-
Choose the method for calculating the days:
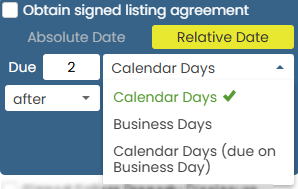
- Business Days: Excludes Saturdays, Sundays, and your company's Business Holidays.
- Calendar Days: Uses all days on the calendar.
- Calendar Days (Due Business Days): Uses all days on the calendar but moves the due date to the next business day if it falls on a weekend or a business holiday.
- Select [Relative Date].
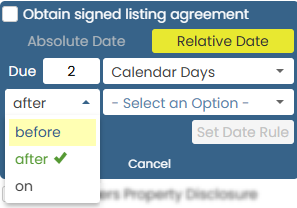
- Set Timing:
- Select whether the due date should be Before, After, or On the specific date.
- Select whether the due date should be Before, After, or On the specific date.
- Choose Date:
- Set the transaction date to base the due date on. You can specify any important transaction date, including Optional Dates and Custom Dates:
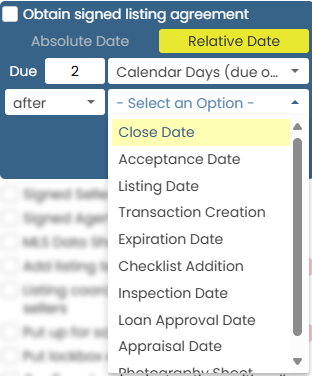
- Transaction Dates
- Transaction Creation Date
- Checklist Addition Date
- Listing Date
- Acceptance Date
- Close Date
- Expiration Date
- Optional Dates: You can also base Relative Due Dates on Optional Dates if your company has turned them on.
- Custom Date Fields: You can also set up Custom Fields for dates and set them to be additional trigger dates for tasks.
- Transaction Dates
- Set the transaction date to base the due date on. You can specify any important transaction date, including Optional Dates and Custom Dates:
- Save:
- Click [Set Date Rule] to save the new date rule.


