Checklists help your team maintain compliance by tracking tasks that need to be completed on transactions. Each task in a template represents a document that needs to be uploaded or any action that helps bring a transaction to close.
As an admin, you can customize Checklist Templates to be used across transactions. These templates can be added to transactions, either manually or automatically, by admins and agents with the appropriate permissions.
Admin Setup
-
Admin Creation: Admins set up Checklist Templates to ensure streamlined workflows across transactions. These templates help standardize tasks and enhance efficiency.
-
Admin Customization: Admins have complete control over modifying Checklist Templates to suit various processes.
Task Optimization
-
@Mention: Use @mention to highlight or assign tasks to individuals or groups for clear communication and enhanced accountability.
-
Relative Due Dates: Automatically set due dates for tasks relative to other transaction dates for hands-off deadline management.
-
Task Visibility: Control task visibility to reduce clutter and ensure only relevant team members see specific tasks.
-
Key Dates: Designate important dates to sync with calendars and coversheets, keeping everyone aligned with critical deadlines.
-
Agent-editable Due Dates: Allow agents to adjust due dates for specific tasks, as needed, providing flexibility while maintaining control.
Automatic Checklist Application
-
Automatically Apply Checklists: Admins can set rules to automatically apply checklists, ensuring all necessary tasks are consistently added to transactions.
-
Custom Rules: Admins define specific criteria for when checklists are applied, tailoring workflows to different transaction types and requirements.
Checklist Template
A Checklist Template outlines necessary documents and actions required for compliance.
Checklist On A Transaction
Once applied to transactions, the checklist ensures that all tasks are completed, keeping you in compliance and moving the transaction forward.

When setting up and using Checklist Templates, consider the following best practices:
Segment Checklist Templates: Organize tasks by creating different templates for different transaction types or different stages of the transaction.
Use Automatic Checklist Application: Whenever possible, apply checklists automatically to streamline your process.
Optimize Tasks: Ensure that tasks are as clear and concise as possible to minimize confusion and maximize efficiency.
Access and view Checklist Templates to add new templates, edit and copy existing ones, download them, and more.
Who Can Do This: Admins with permission to Fully manage checklists and templates.
To access & view Checklist Templates:
- Go to Checklist Templates:
- Click your name in the upper right corner, then [Admin / Settings].
- Select [Checklists] from the Templates section of the left menu.
- View Templates:
- View the list of Checklist Templates for locations where you have Fully manage checklists and templates permission.
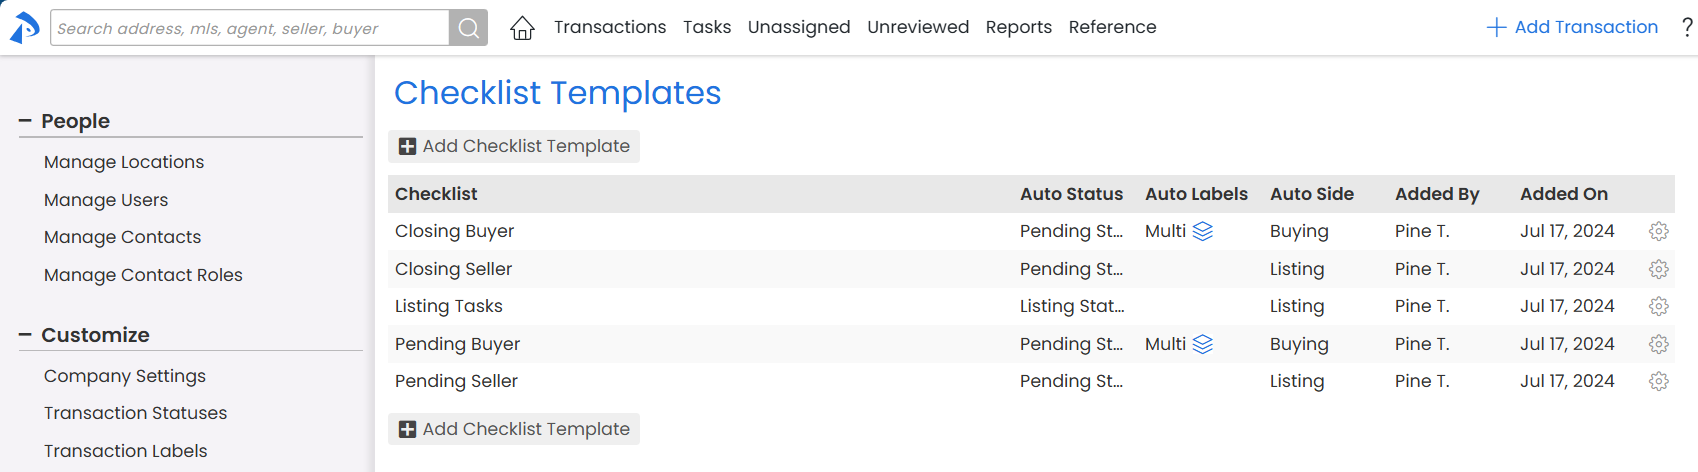
- See the details for each template in the list:
- Checklist: The template's name.
- Location: The related location(s) for each checklist.
- Added By: The person who added the template.
- Added On: The date the template was added.
- See Automatic Checklist Application criteria for each template in the columns for Auto Status, Auto Labels, and Auto Side.
- View the list of Checklist Templates for locations where you have Fully manage checklists and templates permission.

Add a new Checklist Template to track tasks for docs that need to be uploaded or actions that need to be completed on transactions.
Who Can Do This: Admins with permission to Fully manage checklists and templates.
To add a new Checklist Template:
- Go to Checklist Templates:
- Click your name in the upper right corner, then [Admin / Settings].
- Select [Checklists] from the Templates section of the left menu.
- Add Template:
- Click [Add Checklist Template].
- Complete & Save:
- Enter the checklist details (described below).
- Save the new template by clicking [Save Template].
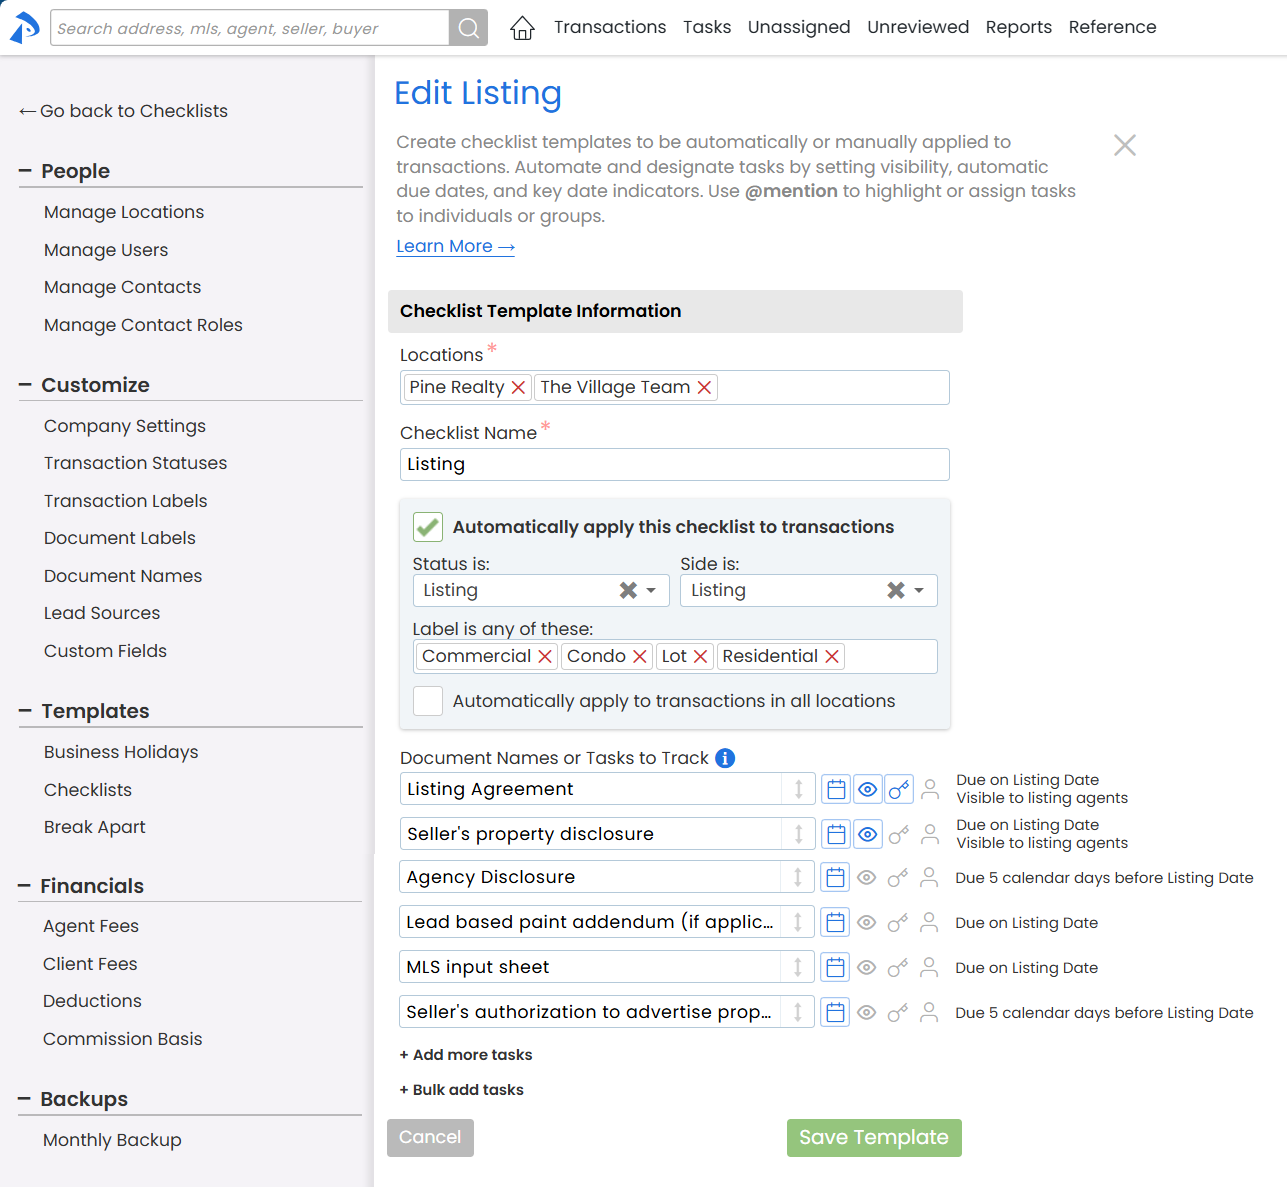
Locations
If your office has multiple Locations, select the locations where admins should have access to edit and manage the template.

You can specify any locations where you have Fully manage checklists and templates permission.
Checklist Name
Enter a descriptive name that clearly indicates the checklist's purpose.

Automatically Apply to Transactions
Optionally, automatically apply this checklist to transactions:
Check the box next to "Automatically apply this checklist to transactions".
Set your desired rules to add the checklist based on Status, Label, and / or Side.

If your office has one location, the checklist will apply to all transactions. For multiple locations, it will apply in the location(s) specified at the top of the template.
Learn more about Automatic Checklist Application →
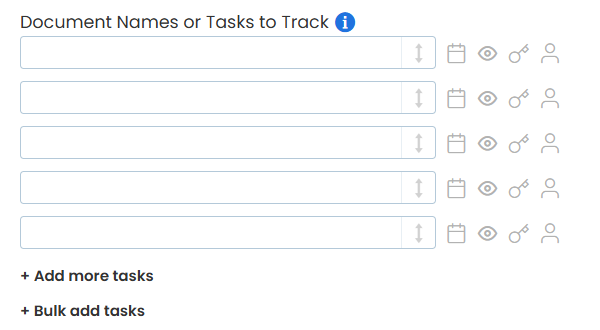
Document Names or Tasks to Track
Add tasks by listing the doc names or actions that need tracking.
-
To add more tasks, click [+ Add more tasks].
-
To add multiple tasks at once, click [+ Bulk add tasks], then paste or type your list and click [Add Tasks].
Task Optimizations
Smart Task-Doc Matching
Add tasks that match your Standard Doc Names to support Smart Task-Doc Matching on transactions.
Learn more about Smart Task-Doc Matching →
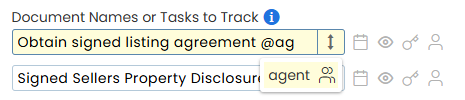
Task @Mentions
Use @mention to highlight tasks for specific individuals or groups.
Learn more about Task @Mentions →
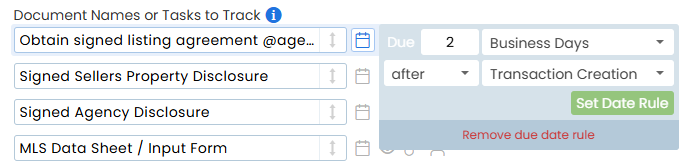
Relative Due Dates
Define Relative Due Dates to automatically set tasks to become due based on the transaction's dates.
Learn more about Relative Due Dates →
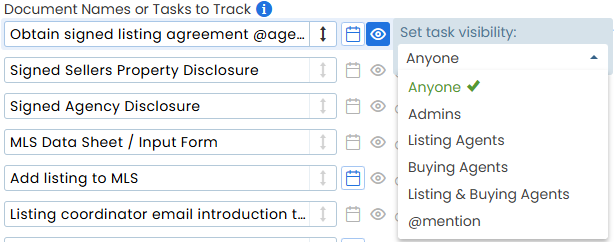
Task Visibility
Control who can view specific tasks by setting Task Visibility.
Learn more about Task Visibility →
Key Dates
Mark critical timeline dates by designating tasks as Key Dates.
Learn more about Key Date Tasks →

Agent-editable Due Dates
Allow agents to adjust task due dates on transactions.
Learn more about Agent-editable Due Dates →

Edit an existing Checklist Template to keep tasks up to date.
Who Can Do This: Admins with permission to Fully manage checklists and templates.
To make changes to an existing Checklist Template:
- Go to Checklist Templates:
- Click your name in the upper right corner, then [Admin / Settings].
- Select [Checklists] from the Templates section of the left menu.
- Open Template:
- Click the name of the template you want to edit.
- Edit & Save:
- Edit any desired fields (described above).
- Click [Save Template] to save your changes.
Editing a Checklist Template will not affect existing transactions where the checklist is already added.
Copy an existing Checklist Template to duplicate it, then make modifications to the copy as needed.
Who Can Do This: Admins with permission to Fully manage checklists and templates.
To copy a Checklist Template:
- Go to Checklist Templates:
- Click your name in the upper right corner, then [Admin / Settings].
- Select [Checklists] from the Templates section of the left menu.
- Copy Template:
- Click the [⚙️] to the right of the template you want to copy.
- Select [Copy Template].
- Edit & Save:
- Edit any desired fields (described above).
- Click [Save Template] to save the new copy.
Download a Checklist Template to back it up or share it with external managers and admins.
Who Can Do This: with permission to Fully manage checklists and templates can download Checklist Templates.
To download a Checklist Template:
- Go to Checklist Templates:
- Click your name in the upper right corner, then [Admin / Settings].
- Select [Checklists] from the Templates section of the left menu.
- Download Template:
- Click the [⚙️] to the right of the template you want to download.
- Select [Download Template].
- Save:
- Once the .csv file downloads:
- It will save to your computer automatically (if your browser is set up for it).
- If not, choose a convenient place to save it.
- Once the .csv file downloads:
Delete an unwanted Checklist Template you no longer need.
Who Can Do This: with permission to Fully manage checklists and templates.
To delete an unwanted Checklist Template:
- Go to Checklist Templates:
- Click your name in the upper right corner, then [Admin / Settings].
- Select [Checklists] from the Templates section of the left menu.
- Delete Template:
- Click the [⚙️] to the right of the template you want to delete.
- Select [Delete Template].
- Confirm:
- Click [delete] again.